Nornimator
by Vadim Trochinsky
Download Nornimator (1.4MB)
Installation: download the Nornimator file and
unzip it in a folder of its own. Please leave the
.dll or .ocx file in the same local folder. DO NOT
copy them into the "system" directory!
If there should be any files missing, please mail
me.
Download Support File (3.5MB)
This is a standard Visual Basic Installer. Vadim
had this one on his site and I put it here only
to complete the whole download. Normally I think
you shouldn't need it. Be carefull as it might overwrite
some system files on your harddisc other programs
need to work!!
|
Nornimator
for XP - Beta version
Works for me also on Windows 2000. Please,
pay attention to the following:
After installation, an icon will appear on
your desktop. After having started the program,
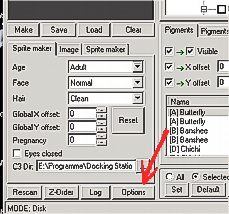
click on the "options" button in
the left down corner.
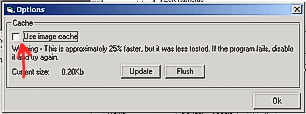
Untick the "use image cache" and
click on "OK". Now the program is
ready to use. ;)
|
Tutorial

Note: All sprites and body data files
have to be installed in the Creatures 3 directory,
otherwhise the Nornimator program won't find the
data and you get error messages such as "out
of range" etc. It seems as if it's possible
to let the program find data at another place on
your hard disc, but this option doesn't work (at
least not for me).
Open the Nornimator program and
the window looks like this:
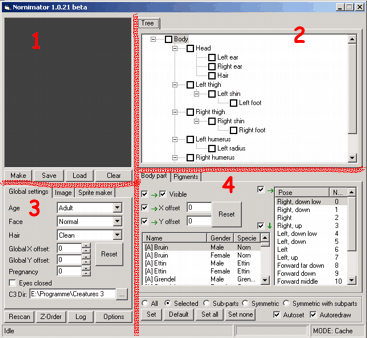
In order to simplify explanations,
I parted the nornimator window into four parts.
On the picture numbered from 1- 4. Please, have
a close look at it, because further on I will only
show cutouts of these parts.
1 = window part art where the norn
get's drawn
2 = window part where body parts and their dependencies
are listed (like in a tree)
3 = window part where you choose drawing options
concerning the whole norn
4 = window part where you choose sprites, poses
and pigment settings
(window part 4)
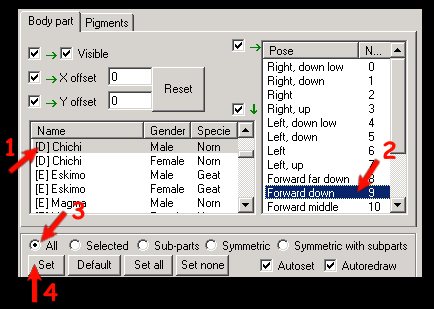
1. Click on the sprite of your choice
(here : Chichi, male). As you can see, there are
the slot letter given (in brackets) and also male
or female and the slot species. Means: e.g. the
Magmas and the Eskimo, both are on slot "E",
but on different species slots, Magmas on Genus
"Norn", Eskimos on Genus "Ettin".
If your breed resp. sprite list doesn't look updated,
you can download
this File. It's called "breeds.txt"
. Just replace the file with the same name in
your nornimator directory and you get a more updated
list with newer breeds.
2. Choose a pose (here: forward down)
3. click on "All", to apply the settins
on all norn's body parts
4. click on "set" (if necessary)
(window part 1)
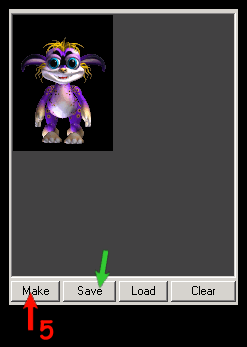
5. click on"make" (if the
Norn hasn't drawn already) That's how the drawn
norn looks like. If you now click on "save"
(green arrow), you can save this picture as a .bmp
file!
(window part 3)
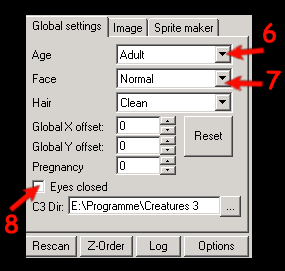
6. here you can choose the age stage
you want to see your norn drawn in
7. choose here the settings of the face expression
of the norn
8. if you tick this, the norn get's drawn with closed
eyes. Just above see the settings for "Pregnancy".
Choose a high value in order to see how the norn
looks pregnant.
(Note: the settings for "hair" cannot
be used. Special sprites would be needed for this)
It might be that the norn doesn't
get drawn automatically with your changes, then
just click on the settings "Set" in the
window part 4 and then on the button "make"
in window part 1.
More ...
(window part 2)
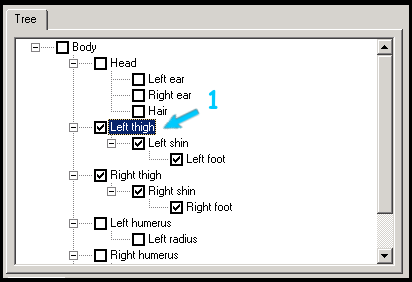
Here you can see the body parts a
norn consists of, listed according to their dependencies.
You can mark the singel parts (as shown on the picture
above)
1. all parts for the legs are ticked
(window part 4)
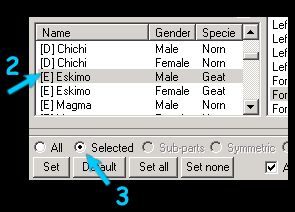
2. choose a sprite set of your choice
(here: Eskimo)
3. Important! Tick the radio button "Selected"
in order to make sure, the settings only get applied
to the before chosen body parts! (Besides that
you can choose another pose, that will apply also
on only the chosen body parts) Maybe you need
to click on "Set" as well, to make the
new settings actual. But you'll find out soon
if you need that or not. Different computers seem
to work differently on that....
(window part 1)
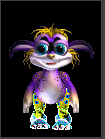
Click on "make" and now
there's a Chichi norn with Eskimo norn legs!
(window part 2 and 1)
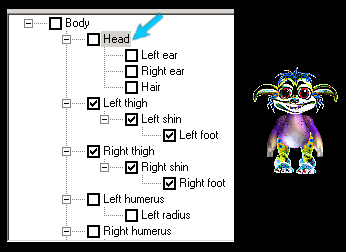
Attention!
If you tick and untick the single
body parts, you might see some gray square underlying
the body part (blue arrow pointing to it). This
means, that the ticked body part is still "active"
and it has the same effect as if the box besides
it is ticked. You can see the result beside this
window: the norn get's a Eskimo head as well, although
the box beside the word "head" isn't ticked!
So if you untick a body part, make sure that the
underlying gray or blue is really gone by clicking
on the text and making it "inactive".
So what can you do now with your knowledge? Well,
for instance, you can make the most impossible norn,
that you'll never see in your game! Give the norn
different sprites for every body part and different
poses for them and you'll end up like this norn
here:
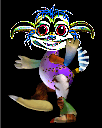
Find out how many and which different
sprites I used for this norn! :-)
A word on colouring
...
(Window 4)
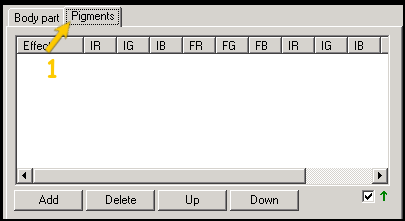
1. Click on the Tab"Pigment"
and this empty window will open up. Then click on
"Add".
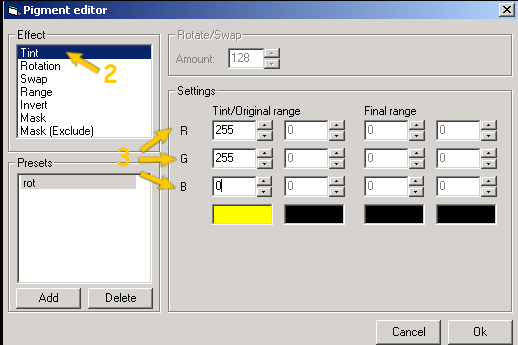
A new dialog will pop up.
2. "Tint" means "colouring"
the body part and has a default setting
3. Choose the amount of red, green and blue, from
0 to 255. Here I put the setting to a very bright
yellow, meaning a very high value for red and
green, very low value for blue.
Then click on "OK".
(windowl 4)
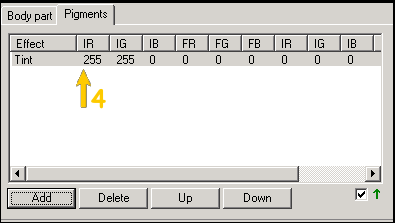
4. As you can see, the colour setting
is written in the tab's list.
Result:
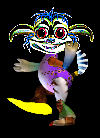
Since I still had the settings for
"right foot" ticked as active from the
experiment before, only this body part was coloured,
the rest stayed the way it was. Of course, you can
colour your whole norn! For this, click in the window
part 4 on "All". As long as "Selected"
it's chosen, the settings will only apply to the
chosen body parts. You can colour each body part
differently if you like in order to make your norn
look even crazier than before!
Restriction: In the popup dialog,
you might have noticed the settings for "Rotation"
and "Swap". I'm not going to explain,
what this means (the ones who are a bit into the
genetics of pigment and pigment bleed genes know
anyway), since these features are not working unfortunately.
Maybe one day Vadim makes a new version of the nornimator
where it is going to work as it does in the creatures
game.

